
在 Python 中使用 Tensorflow 檢測垃圾郵件

?
垃圾郵件是指批量發送給用戶的未經請求或不受歡迎的消息/電子郵件。在大多數消息/電子郵件服務中,消息會自動檢測為垃圾郵件,這樣這些消息就不會不必要地涌入用戶的收件箱。這些消息通常是促銷性的和奇特的。因此,我們可以構建可以檢測垃圾郵件的 ML/DL 模型。
在 Python 中使用 Tensorflow 檢測垃圾郵件
在本文中,我們將構建一個基于 TensorFlow 的垃圾郵件檢測器;簡單來說,我們將不得不將文本分類為 Spam 或 Ham。 這意味著 Spam detection 是 Text Classification 問題的一個例子。因此,我們將對數據集執行 EDA 并構建文本分類模型。
導入庫
Python 庫使我們能夠非常輕松地處理數據并使用一行代碼執行典型和復雜的任務。
熊貓 – 該庫有助于以 2D 數組格式加載數據幀,并具有多種功能可以一次性執行分析任務。
Numpy – Numpy 數組速度非常快,可以在很短的時間內執行大型計算。
Matplotlib/Seaborn/Wordcloud– 此庫用于繪制可視化。
NLTK – Natural Language Tool Kit 提供了各種功能來處理原始文本數據。
?
- Python3 語言
# Importing necessary libraries for EDA
import numpy as np
import pandas as pd
import matplotlib.pyplot as plt
import seaborn as sns
import string
import nltk
from nltk.corpus import stopwords
from wordcloud import WordCloud
nltk.download('stopwords')
# Importing libraries necessary for Model Building and Training
import tensorflow as tf
from tensorflow.keras.preprocessing.text import Tokenizer
from tensorflow.keras.preprocessing.sequence import pad_sequences
from sklearn.model_selection import train_test_split
from keras.callbacks import EarlyStopping, ReduceLROnPlateau
import warnings
warnings.filterwarnings('ignore')
|
加載數據集
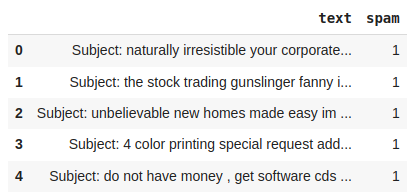
現在,讓我們將數據集加載到 pandas 數據幀中,并查看數據集的前五行。數據集鏈接 – []
- Python3 語言
data = pd.read_csv('Emails.csv')
data.head()
|
輸出:
 ?
?

數據集的前五行
為了檢查我們擁有多少這樣的推文數據,讓我們打印數據框的形狀。
- Python3 語言
data.shape
|
輸出:
(5171, 2)
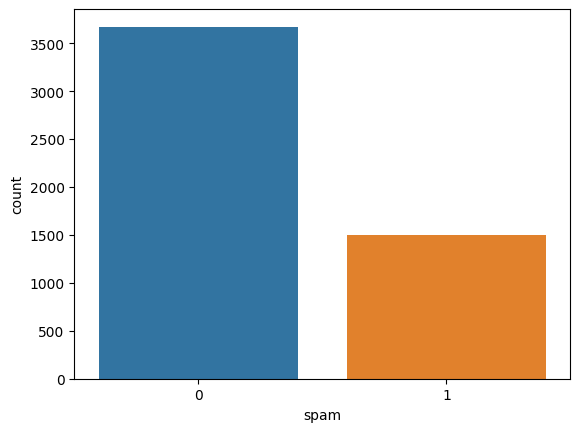
為了更好地理解,我們將繪制這些計數:
- Python3 語言
sns.countplot(x='spam', data=data)
plt.show()
|
輸出:
 ?
?

垃圾郵件標簽的計數圖
我們可以清楚地看到,Ham 的樣本數量遠多于 Spam 的樣本數量,這意味著我們使用的數據集是不平衡的。
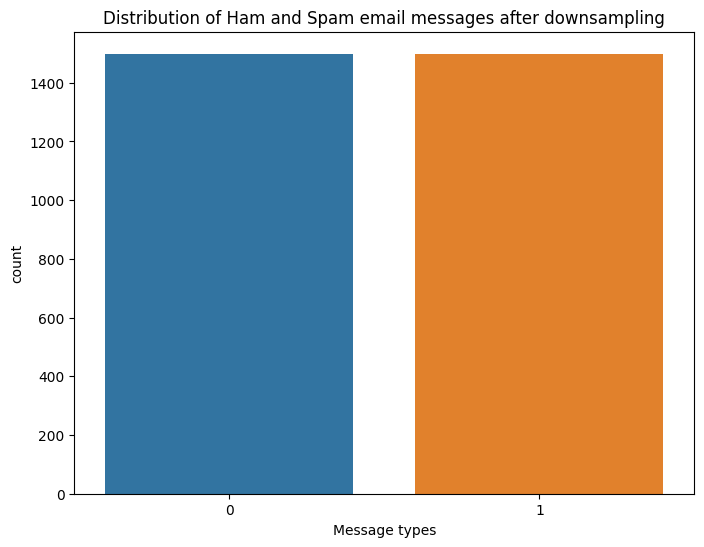
- Python3 語言
# Downsampling to balance the dataset
ham_msg = data[data.spam == 0]
spam_msg = data[data.spam == 1]
ham_msg = ham_msg.sample(n=len(spam_msg),
random_state=42)
# Plotting the counts of down sampled dataset
balanced_data = ham_msg.append(spam_msg)\
.reset_index(drop=True)
plt.figure(figsize=(8, 6))
sns.countplot(data = balanced_data, x='spam')
plt.title('Distribution of Ham and Spam email messages after downsampling')
plt.xlabel('Message types')
|
輸出:
 ?
?

縮減采樣后 Ham 和 Spam 電子郵件的分布
文本預處理
?
文本數據是高度非結構化的,需要注意很多方面:
停用詞免職
標點符號免職
詞干提取或詞形還原
?
?
盡管刪除數據意味著信息丟失,但我們需要這樣做才能使數據完美地饋送到機器學習模型中。
- Python3 語言
balanced_data['text'] = balanced_data['text'].str.replace('Subject', '')
balanced_data.head()
|
輸出:
|
|
發短信 |
垃圾郵件 |
|---|---|---|
| 0 |
: 康可 – 大牛仔\r\nDarren :\r\nI ' m not... |
0 |
| 1 |
: Feb 01 Prod: 出售給 Teco Gas Processing\r\... |
0 |
| 2 |
: 加利福尼亞能源危機\r\ncalifornia , s... |
0 |
| 3 |
: 回復 : nom / 4 月 23 日的實際交易量\r\n... |
0 |
| 4 |
: Eastrans 提名變更生效 8 / 2 ... |
0 |
- Python3 語言
punctuations_list = string.punctuation
def remove_punctuations(text):
temp = str.maketrans('', '', punctuations_list)
return text.translate(temp)
balanced_data['text']= balanced_data['text'].apply(lambda x: remove_punctuations(x))
balanced_data.head()
|
輸出:
| 發短信 |
垃圾郵件 |
|
|---|---|---|
| 0 |
conoco 大牛仔 Darren 肯定有助于了解其他... |
0 |
| 1 |
2月 01 產品銷售 teco gas processing sale 交易... |
0 |
| 2 |
加州能源危機 加州電力危機 |
0 |
| 3 |
nom 實際卷 4 月 23 日同意 eileen pon... |
0 |
| 4 |
Eastrans 提名變更生效 8 2 00 p... |
0 |
下面的函數是一個輔助函數,可以幫助我們刪除停用詞。
- Python3 語言
def remove_stopwords(text):
stop_words = stopwords.words('english')
imp_words = []
# Storing the important words
for word in str(text).split():
word = word.lower()
if word not in stop_words:
imp_words.append(word)
output = " ".join(imp_words)
return output
balanced_data['text'] = balanced_data['text'].apply(lambda text: remove_stopwords(text))
balanced_data.head()
|
輸出:
|
|
發短信 |
垃圾郵件 |
|---|---|---|
| 0 |
康可大牛仔達倫 (Darren) 肯定有助于了解其他... |
0 |
| 1 |
2 月 1 日 產品銷售 TECO 天然氣加工銷售交易... |
0 |
| 2 |
加州能源危機 加州電力危機 |
0 |
| 3 |
nom 實際卷 4 月 23 日同意 eileen pon... |
0 |
| 4 |
Eastrans 提名變更生效 8 2 00 p... |
0 |
詞云是一種文本可視化工具,可幫助我們深入了解數據語料庫中最常見的單詞。
- Python3 語言
def plot_word_cloud(data, typ):
email_corpus = " ".join(data['text'])
plt.figure(figsize=(7, 7))
wc = WordCloud(background_color='black',
max_words=100,
width=800,
height=400,
collocations=False).generate(email_corpus)
plt.imshow(wc, interpolation='bilinear')
plt.title(f'WordCloud for {typ} emails', fontsize=15)
plt.axis('off')
plt.show()
plot_word_cloud(balanced_data[balanced_data['spam'] == 0], typ='Non-Spam')
plot_word_cloud(balanced_data[balanced_data['spam'] == 1], typ='Spam')
|
輸出:
 ?
?

詞云
Word2Vec 轉換
我們不能將單詞輸入機器學習模型,因為它們只處理數字。因此,首先,我們將單詞轉換為帶有標記 ID 的向量,然后填充它們后,我們的文本數據將到達一個可以將其饋送到模型的階段。
- Python3 語言
#train test split
train_X, test_X, train_Y, test_Y = train_test_split(balanced_data['text'],
balanced_data['spam'],
test_size = 0.2,
random_state = 42)
|
我們已經在訓練數據上安裝了分詞器,我們將使用它來將訓練和驗證數據都轉換為向量。
- Python3 語言
# Tokenize the text data
tokenizer = Tokenizer()
tokenizer.fit_on_texts(train_X)
# Convert text to sequences
train_sequences = tokenizer.texts_to_sequences(train_X)
test_sequences = tokenizer.texts_to_sequences(test_X)
# Pad sequences to have the same length
max_len = 100 # maximum sequence length
train_sequences = pad_sequences(train_sequences,
maxlen=max_len,
padding='post',
truncating='post')
test_sequences = pad_sequences(test_sequences,
maxlen=max_len,
padding='post',
truncating='post')
|
模型開發和評估
?
我們將實現一個 Sequential 模型,該模型將包含以下部分:
三個嵌入層,用于學習輸入向量的特色向量表示。
一個 LSTM 層,用于識別序列中的有用模式。
然后我們將有一個全連接層。
最后一層是輸出層,它輸出兩個類的概率。
- Python3 語言
# Build the model
model = tf.keras.models.Sequential()
model.add(tf.keras.layers.Embedding(input_dim=len(tokenizer.word_index) + 1,
output_dim=32,
input_length=max_len))
model.add(tf.keras.layers.LSTM(16))
model.add(tf.keras.layers.Dense(32, activation='relu'))
model.add(tf.keras.layers.Dense(1, activation='sigmoid'))
# Print the model summary
model.summary()
|
輸出:
Model: "sequential"
_________________________________________________________________
 Layer (type)                Output Shape              Param #
=================================================================
 embedding (Embedding)       (None, 100, 32)           1274912

 lstm (LSTM)                 (None, 16)                3136

 dense (Dense)               (None, 32)                544

 dense_1 (Dense)             (None, 1)                 33

=================================================================
Total params: 1,278,625
Trainable params: 1,278,625
Non-trainable params: 0
_________________________________________________________________
在編譯模型時,我們提供以下三個基本參數:
optimizer – 這是有助于使用梯度下降優化成本函數的方法。
loss – 損失函數,我們通過該函數來監控模型是否隨著訓練而改進。
metrics (指標) – 這有助于通過預測訓練和驗證數據來評估模型。
?
- Python3 語言
model.compile(loss = tf.keras.losses.BinaryCrossentropy(from_logits = True),
metrics = ['accuracy'],
optimizer = 'adam')
|
回調
?
回調用于檢查模型是否在每個 epoch 中都在改進。如果不是,那么需要采取哪些必要步驟,例如 ReduceLROnPlateau 進一步降低學習率?即使這樣,如果模型性能沒有提高,則 EarlyStopping 將停止訓練。我們還可以定義一些自定義回調,以便在早期獲得所需結果時停止訓練。
- Python3 語言
es = EarlyStopping(patience=3,
monitor = 'val_accuracy',
restore_best_weights = True)
lr = ReduceLROnPlateau(patience = 2,
monitor = 'val_loss',
factor = 0.5,
verbose = 0)
|
現在讓我們訓練模型:
- Python3 語言
# Train the model
history = model.fit(train_sequences, train_Y,
validation_data=(test_sequences, test_Y),
epochs=20,
batch_size=32,
callbacks = [lr, es]
)
|
輸出:
Epoch 1/20
75/75 [==============================] - 6s 48ms/step - loss: 0.6857 - accuracy: 0.5513 - val_loss: 0.6159 - val_accuracy: 0.7300 - lr: 0.0010
Epoch 2/20
75/75 [==============================] - 3s 42ms/step - loss: 0.3207 - accuracy: 0.9262 - val_loss: 0.2201 - val_accuracy: 0.9383 - lr: 0.0010
Epoch 3/20
75/75 [==============================] - 3s 38ms/step - loss: 0.1590 - accuracy: 0.9625 - val_loss: 0.1607 - val_accuracy: 0.9600 - lr: 0.0010
Epoch 4/20
75/75 [==============================] - 4s 47ms/step - loss: 0.1856 - accuracy: 0.9545 - val_loss: 0.1398 - val_accuracy: 0.9700 - lr: 0.0010
Epoch 5/20
75/75 [==============================] - 3s 43ms/step - loss: 0.0781 - accuracy: 0.9850 - val_loss: 0.1122 - val_accuracy: 0.9750 - lr: 0.0010
Epoch 6/20
75/75 [==============================] - 3s 46ms/step - loss: 0.0563 - accuracy: 0.9908 - val_loss: 0.1129 - val_accuracy: 0.9767 - lr: 0.0010
Epoch 7/20
75/75 [==============================] - 3s 42ms/step - loss: 0.0395 - accuracy: 0.9937 - val_loss: 0.1088 - val_accuracy: 0.9783 - lr: 0.0010
Epoch 8/20
75/75 [==============================] - 4s 50ms/step - loss: 0.0327 - accuracy: 0.9950 - val_loss: 0.1303 - val_accuracy: 0.9750 - lr: 0.0010
Epoch 9/20
75/75 [==============================] - 3s 43ms/step - loss: 0.0272 - accuracy: 0.9958 - val_loss: 0.1337 - val_accuracy: 0.9750 - lr: 0.0010
Epoch 10/20
75/75 [==============================] - 3s 43ms/step - loss: 0.0247 - accuracy: 0.9962 - val_loss: 0.1351 - val_accuracy: 0.9750 - lr: 5.0000e-04
現在,讓我們根據驗證數據評估模型。
- Python3 語言
# Evaluate the model
test_loss, test_accuracy = model.evaluate(test_sequences, test_Y)
print('Test Loss :',test_loss)
print('Test Accuracy :',test_accuracy)
|
輸出:
19/19 [==============================] - 0s 7ms/step - loss: 0.1088 - accuracy: 0.9783
Test Loss : 0.1087912991642952
Test Accuracy : 0.9783333539962769
因此,訓練準確率為 97.44%,這是相當令人滿意的。
模型評估結果
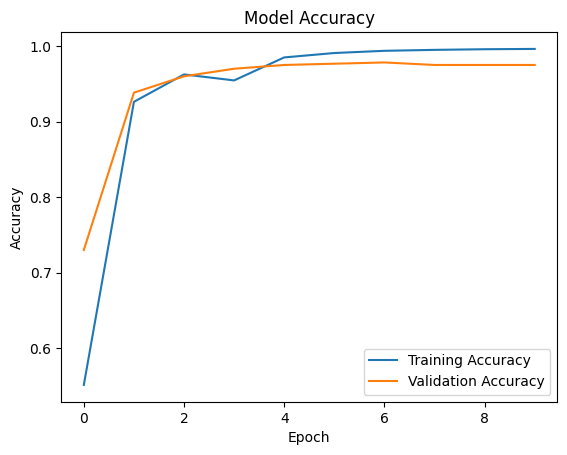
訓練模型后,我們可以繪制一個圖表,描述訓練和驗證精度的方差。的時代。
- Python3 語言
plt.plot(history.history['accuracy'], label='Training Accuracy')
plt.plot(history.history['val_accuracy'], label='Validation Accuracy')
plt.title('Model Accuracy')
plt.ylabel('Accuracy')
plt.xlabel('Epoch')
plt.legend()
plt.show()
|
輸出:
 ?
?

模型精度
?


工程師必備
- 項目客服
- 培訓客服
- 平臺客服
TOP


